
Keyboard shortcuts
All keys at a glance, taken straight from the program so the list is always right.
บทนี้ยังไม่ได้แปลเป็นภาษาไทย เนื้อหาด้านล่างเป็นภาษาอังกฤษ
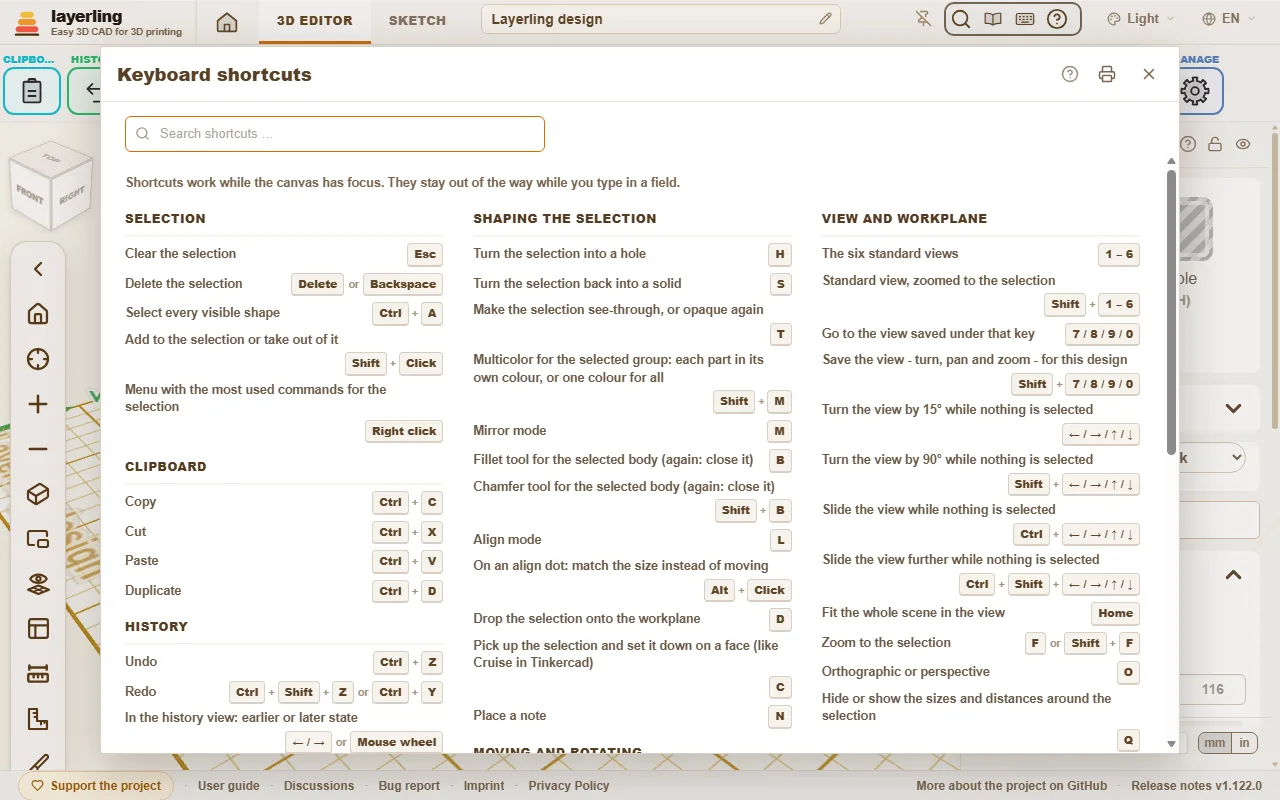
The shortcuts work as long as the workplane has the focus. While you type in a field they keep out of the way. On the Mac, Cmd applies wherever Ctrl is listed here.
In the editor, “คีย์ลัด” in the “ช่วยเหลือ” area opens the same list as a window. The printer button in the window (“พิมพ์หรือบันทึกเป็น PDF”) prints the list on its own, black on white, the whole list on one side of an A4 or Letter sheet in three columns, to keep at hand as a quick reference; the print dialog of the browser also offers to save it as a PDF.
The box at the top of the window searches the list: it keeps only the shortcuts whose sentence, group or keys contain every word you type, so "fillet" or "ctrl+z" leaves just those rows. Capital letters and accents do not matter, and a single letter or digit finds that key and the words that start with it. The X at the end of the box empties it; with the box empty the whole list is back. The printer button prints what the window shows, so after a search it prints only the shortcuts found.
Command search
Can't find a tool? Press Ctrl+K or click the magnifying glass in the “ช่วยเหลือ” area, then type what you are looking for: a tool ("fillet", "mirror"), a shape ("cylinder") or a command ("export", "undo"). Move with the arrow keys and press Enter, or click the entry.
- The search understands the English and the German word alike and ignores capital letters and umlauts: "aushoehlen" finds “ทำกลวง”.
- Every entry shows the keys that do the same and the group of the ribbon it lives in, so you learn where it is.
- Entries that are greyed out cannot run right now, mostly because nothing is selected. They stay in the list so the search still tells you where the tool is.
The guide you are reading has a search box too, at the top of every page: type a word or two and it lists the sections that contain all of them, with the matching words marked. Click one, or press Enter for the first, to jump straight there. The page it opens marks every place your words appear and scrolls to the first one in that section; Esc or a click on a mark clears them.
- A shape's name adds that shape to the workplane, just like clicking it in the shapes menu.
- With an empty field the search lists the commands you used last at the top.
- The name of a body in your design finds that body and selects it, which helps in a design with many parts. Bodies only appear once you type.
- A custom shape you saved is found by its name too, once you type, and a click puts it into the design as in the shapes panel.
- It works in sketch mode as well, with the sketch tools.
Your own keys
Any command of the command search can go on a key of your own: a tool you use all the time, a shape, “จัดไว้กลางพื้นงาน” or “เปิดแผงรูปทรง”.
- Open “คีย์ลัด” and click “เพิ่มปุ่มลัด” under “ปุ่มลัดของคุณเอง” at the top of the window.
- Type a few letters of the command and click it, or press Enter for the first one.
- Press the key you want, alone or with Ctrl, Alt or Shift. Letters, digits and F1 to F12 can take a command.
A key the editor already uses, one the browser keeps for itself (such as Ctrl+W) or one of your own keys is refused, and the window says what it does. Click a key in the list to change it, the X next to it to remove it, or “ลบปุ่มลัดของฉันทั้งหมด” to start over.
- The key runs the command just as the command search does. If it cannot run right now, mostly because nothing is selected, the status bar says so.
- Your keys show next to their commands in the command search and on the printed list.
- They stay in this browser, like the theme. A key for a sketch tool works in sketch mode, a key for the 3D editor outside it.
- While you type in a field, your keys keep out of the way like all the others.
Interactive Help
Cannot find where to read about a button or a field? Let the program take you there. Click the question mark in the “ช่วยเหลือ” area, or press Shift+F1. The pointer turns into a question mark, and whatever lies under it is outlined.
- Click a button, a field, a switch, a handle, a group of the ribbon or the title bar of a window. It does not do what it normally does. A small window opens instead, with the name of the element, a short summary of the part of this guide that is about it, up to two more places that mention it, and “เปิดในคู่มือ”.
- The help is about the element you pointed at, not about the whole window around it. An element without a name of its own uses the nearest one around it; inside a window it falls back on that window's question mark.
- “เปิดในคู่มือ” opens the guide at that section in a new tab. There the section is outlined in colour, from its heading to its end, so you see where it starts and stops.
- If the guide says nothing about the element, the window says so and offers “ค้นหาในคู่มือ”.
- Esc, or the question mark again, leaves the mode. On a touch screen there is no hover: a tap on an element opens the window straight away.
The window moves by its title bar like the other windows. The program finds the section by the name of the element - the label on a button, the name of a field - because this guide writes every button as it is called in the program. It looks it up in the same search as the box at the top of each guide page, in the language you are using, and runs entirely in your browser.
ที่เลือก
| Esc | ยกเลิกการเลือก |
| Delete หรือ Backspace | ลบที่เลือก |
| Ctrl+A | เลือกรูปทรงที่มองเห็นทั้งหมด |
| Shift+คลิก | เพิ่มเข้าหรือเอาออกจากที่เลือก |
| คลิกขวา | เมนูคำสั่งที่ใช้บ่อยสำหรับที่เลือก |
คลิปบอร์ด
| Ctrl+C | คัดลอก |
| Ctrl+X | ตัด |
| Ctrl+V | วาง |
| Ctrl+D | ทำสำเนา |
ประวัติ
| Ctrl+Z | ย้อนกลับ |
| Ctrl+Shift+Z หรือ Ctrl+Y | ทำซ้ำ |
| ← / → หรือ Wheel | ในมุมมองประวัติ: สถานะก่อนหน้าหรือถัดไป |
| PgUp / PgDn | ในมุมมองประวัติ: ย้อนหรือไปข้างหน้าสิบสถานะ |
| Home / End | ในมุมมองประวัติ: สถานะเก่าสุดหรือสถานะปัจจุบัน |
| Esc | ในมุมมองประวัติ: กลับไปสถานะปัจจุบัน |
ไฟล์
| Ctrl+I | เปิดหรือปิดหน้าต่างนำเข้า |
| Ctrl+E | เปิดหรือปิดหน้าต่างส่งออก |
| Ctrl+S | บันทึกงานออกแบบลงไฟล์ของมัน |
รวมกลุ่มและการแสดงผล
| Ctrl+G | รวมกลุ่ม |
| Ctrl+B | มัดรวม (ยึดไว้ด้วยกันโดยไม่หลอมรวม) |
| Ctrl+Shift+G | แยกกลุ่มหรือแยกมัดรวม |
| E | แก้ไขกลุ่มที่เลือก |
| Ctrl+L | ล็อกหรือปลดล็อกที่เลือก |
| Ctrl+Shift+L | ล็อกหรือปลดล็อกเฉพาะรูปทรง: ชิ้นส่วนยังย้าย หมุน และรวมกลุ่มได้ |
| Ctrl+H | ซ่อนที่เลือก |
| Ctrl+Shift+H | แสดงทุกอย่างที่ซ่อนไว้ |
| Shift+N | แสดงหรือซ่อนโน้ตและจุด |
| Ctrl+Shift+O | แสดงหรือซ่อนรายการชิ้นงาน |
ปรับรูปที่เลือก
| H | เปลี่ยนที่เลือกเป็นชิ้นเจาะรู |
| S | เปลี่ยนที่เลือกกลับเป็นชิ้นตัน |
| T | ทำให้ที่เลือกโปร่งใส หรือกลับมาทึบ |
| Shift+M | หลายสีสำหรับกลุ่มที่เลือก: แต่ละชิ้นส่วนเป็นสีของตัวเอง หรือสีเดียวทั้งหมด |
| M | โหมดสะท้อน |
| B | เครื่องมือลบมุมโค้งสำหรับชิ้นงานที่เลือก (กดอีกครั้ง: ปิด) |
| Shift+B | เครื่องมือลบมุมเฉียงสำหรับชิ้นงานที่เลือก (กดอีกครั้ง: ปิด) |
| L | โหมดจัดแนว |
| Alt+คลิก | บนจุดจัดแนว: ปรับขนาดให้เท่ากันแทนการย้าย |
| Alt+คลิก | บนจุดระยะห่างเท่ากัน: พิมพ์ระยะห่างที่จะใช้ |
| D | วางที่เลือกลงบนพื้นงาน |
| Alt+D | วางที่เลือกลงเป็นชิ้นเดียว ชิ้นส่วนต่างๆ คงความสูงต่อกันไว้เหมือนเดิม |
| C | หยิบที่เลือกขึ้นมาแล้ววางลงบนหน้า (เหมือน Cruise ใน Tinkercad) |
| N | วางโน้ต |
ย้ายและหมุน
| ← / → / ↑ / ↓ | ย้ายหนึ่งช่องกริด ตามทิศที่หันมุมมองอยู่ |
| Shift+← / → / ↑ / ↓ | ย้ายห้าช่องกริด |
| Alt+← / → / ↑ / ↓ | ย้ายหนึ่งในห้าของช่องกริด |
| Ctrl+↑ / ↓ | ยกที่เลือกขึ้นหรือลดลง |
| R | หมุน 45° |
| Shift+R | หมุน 22.5° |
| Shift | กดค้างระหว่างลาก: ย้ายตามแกน X หรือ Y อย่างเดียว |
| Alt+ลาก | ลากออกมาเป็นสำเนา ต้นฉบับอยู่ที่เดิม |
| Alt | กดหนึ่งครั้งระหว่างลาก: พักการจับรูปทรงอื่น |
| Alt+Enter | ตอนพิมพ์ขนาดข้างรูปทรง: ขยายรอบจุดกึ่งกลาง แทนการขยายจากขอบฝั่งตรงข้าม |
มุมมองและพื้นงาน
| 1 – 6 | มุมมองมาตรฐานหกด้าน |
| Shift+1 – 6 | มุมมองมาตรฐาน พร้อมซูมไปที่ที่เลือก |
| 7 / 8 / 9 / 0 | ไปยังมุมมองที่บันทึกไว้กับปุ่มนั้น |
| Shift+7 / 8 / 9 / 0 | บันทึกมุมมอง - การหมุน เลื่อน และซูม - สำหรับงานออกแบบนี้ |
| ← / → / ↑ / ↓ | หมุนมุมมอง 15° เมื่อไม่ได้เลือกอะไร |
| Shift+← / → / ↑ / ↓ | หมุนมุมมอง 90° เมื่อไม่ได้เลือกอะไร |
| Ctrl+← / → / ↑ / ↓ | เลื่อนมุมมองเมื่อไม่ได้เลือกอะไร |
| Ctrl+Shift+← / → / ↑ / ↓ | เลื่อนมุมมองไกลขึ้นเมื่อไม่ได้เลือกอะไร |
| Home | ดึงทั้งฉากให้อยู่ในมุมมอง |
| F หรือ Shift+F | ซูมไปที่ที่เลือก |
| O | ออร์โธกราฟิกหรือเพอร์สเปกทีฟ |
| Q | ซ่อนหรือแสดงขนาดและระยะรอบที่เลือก |
| + หรือ − | ซูมเข้าหรือออก |
| Alt+1 – 0 | เลือกระยะกริดจับ: รายการที่ตรงกับตัวเลขนั้นในเมนู |
| , หรือ . | กริดจับละเอียดขึ้นหรือหยาบขึ้นหนึ่งขั้น |
| คลิกกลาง | เปิดเมนูกริดจับตรงตัวชี้ |
| W | วางพื้นงาน |
| Shift+W | วางพื้นงานบนหน้าที่เลือก |
| Alt+W | คืนพื้นงานกลับไปที่ฐาน |
| P | มองตรงลงบนพื้นงาน |
| Shift | กดค้างระหว่างวางเพื่อกลับทิศ |
| Esc | ออกจากโหมดพื้นงานหรือโหมดตลับเมตร |
ช่วยเหลือ
| Ctrl+K | เปิดการค้นหาคำสั่ง |
| Shift+F1 | เปิดหรือปิดตัวช่วยแบบโต้ตอบ |
| Ctrl+Shift+F | เปิดหรือปิดโหมดโฟกัส (ซ่อนแถบชื่อและส่วนท้ายหน้า) |
โหมดสเก็ตช์
| Ctrl+K | เปิดการค้นหาคำสั่ง |
| Shift+F1 | เปิดหรือปิดตัวช่วยแบบโต้ตอบ |
| Ctrl+Shift+F | เปิดหรือปิดโหมดโฟกัส (ซ่อนแถบชื่อและส่วนท้ายหน้า) |
| Esc | วางเครื่องมือ (กลับไปที่ "เลือก") แล้วยกเลิกการเลือก |
| Delete หรือ Backspace | ลบองค์ประกอบที่เลือก |
| Ctrl+C | คัดลอก |
| Ctrl+X | ตัด |
| Ctrl+V | วาง |
| Ctrl+D | ทำสำเนา |
| Ctrl+Z | ย้อนกลับ |
| Ctrl+Shift+Z หรือ Ctrl+Y | ทำซ้ำ |
| Ctrl+A | เลือกทุกจุดและทุกเส้น |
| R | หมุนสเก็ตช์ที่ปิดแล้ว 45° |
| Ctrl+L | ล็อกหรือปลดล็อกเส้นขอบที่เลือกหรือภาพอ้างอิง |
| N | วางโน้ต |
| Shift+N | แสดงหรือซ่อนโน้ตและจุด |
| Ctrl+← / → / ↑ / ↓ | เลื่อนมุมมองเมื่อไม่ได้เลือกอะไร |
| Ctrl+Shift+← / → / ↑ / ↓ | เลื่อนมุมมองไกลขึ้นเมื่อไม่ได้เลือกอะไร |
| Home | ดึงสเก็ตช์ทั้งหมดให้อยู่ในมุมมอง |
| F หรือ Shift+F | ซูมไปที่ที่เลือกในสเก็ตช์ |
| + หรือ − | ซูมเข้าหรือออกในสเก็ตช์ |
| Alt+1 – 0 | เลือกระยะกริดจับ: รายการที่ตรงกับตัวเลขนั้นในเมนู |
| , หรือ . | กริดจับละเอียดขึ้นหรือหยาบขึ้นหนึ่งขั้น |
| คลิกกลาง | เปิดเมนูกริดจับตรงตัวชี้ |
| Alt+Enter | ในช่องความยาวของเส้น: ขยายออกทั้งสองข้าง |
| ← / → / ↑ / ↓ หรือ Shift+← / → / ↑ / ↓ | ย้ายจุด เส้น หรือภาพที่เลือกหนึ่งช่องกริด (Shift: ขั้นใหญ่ขึ้น, Alt: หนึ่งในห้าของขั้น) |
| ← / → / ↑ / ↓ หรือ Shift+← / → / ↑ / ↓ | ย้ายปุ่มจับเส้นโค้งที่คลิกไว้หนึ่งช่องกริด (Shift: ขั้นใหญ่ขึ้น, Alt: หนึ่งในห้าของขั้น) |
| 1 หรือ 2 หรือ 3 หรือ 4 หรือ 5 | เลือกเครื่องมือวาด: 1 เส้นตรง, 2 เส้นโค้งเบซิเยร์, 3 เส้นโค้งเรียบ, 4 เพิ่มหรือลบจุด, 5 วาดอิสระ (ตอนที่ไม่ได้กำลังวาดเส้นอยู่) |
| Shift | ระหว่างวาด: จับมุมเส้นใหม่ทีละ 15° |
| Shift | ระหว่างลาก: ล็อกให้ย้ายตามแกนเดียว |
| Alt | ระหว่างวางหรือลากจุด: จับเฉพาะกริด ไม่จับมุมและจุดกึ่งกลาง |
| 0-9 หรือ < หรือ Tab หรือ Enter | ระหว่างวาด: พิมพ์ความยาว "<" หรือ Tab สำหรับมุม Enter เพื่อวางจุด |
ลบมุมเฉียงและลบมุมโค้ง
| Enter | ใช้ตามตัวอย่าง |
| Esc | ทิ้งตัวอย่าง |